After you create a presentation or slideshow on PowerPoint 2007, you might want to take it with you to the place where you have to convey the presentation. You can easily make a PowerPoint 2007 presentation CD if you can’t carry your computer with you. If you make a PowerPoint 2007 presentation CD, you can easily distribute it to others as well. You will need a writable CD drive installed in the computer you are using. A blank CD will also be required. Put it in the CD drive before starting this procedure. Follow these steps in order to make a PowerPoint 2007 presentation CD:  

Open the PowerPoint 2007 presentation you want to transfer into a compact disk.


Click on the "Office" button.

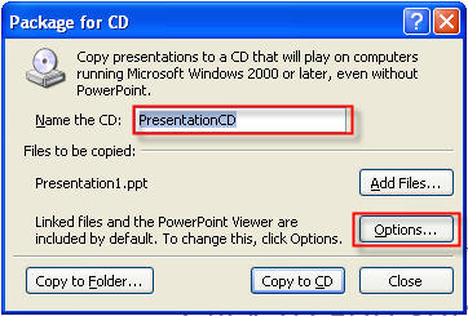
Select "Publish" and click on "Package for CD" from the menu.

Picture
The "Package for CD" window will open. Choose the kind of package you want to use by clicking on Options. The "Viewer Package" choice contains the PowerPoint viewer. The Viewer Package choice is suitable when the person you want to give the CD to doesn’t have PowerPoint in his computer.
Picture

Select the "Embedded Truetype Fonts" checkbox on the Options menu. This will make the presentation fonts legible on a different computer.

If you have added external files, such as a narration in the presentation, then select the checkbox called "Linked files".

Picture
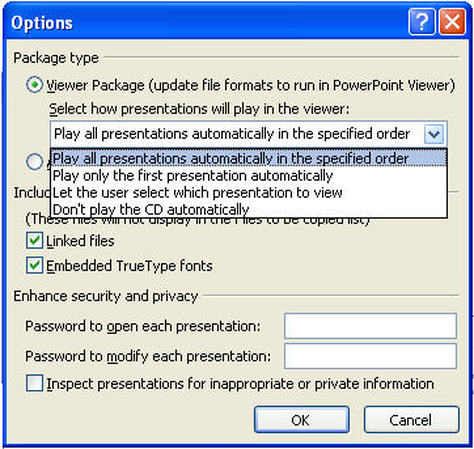
Click on the "OK" button.

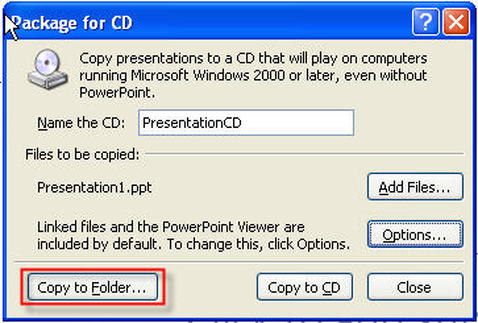
Select the "Copy to Folder" option from the “Package for CD” window. A back-up copy of the presentation will be made on the drive.

Picture
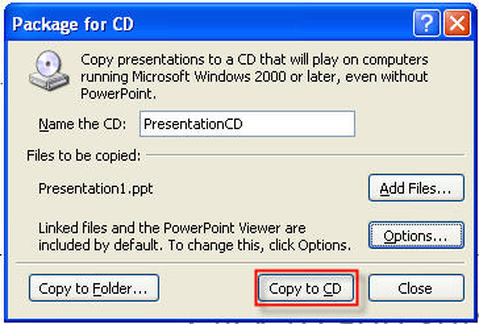
Now click on the "Copy to CD" button from the “Package for CD” window pane.
Picture
After you make a PowerPoint 2007 presentation CD, you can take it out of your computer and check if it is working on a different computer.

 
This tool is fantastic for anyone who is studying or writing reports with references in them.
Click on the Reference tab on the ribbon.
Picture
The best way to use this tool is to enter your references as you go. To add a reference click on Manage Sources, The dialog box below will display.
Picture
You will notice the list of references that are already stored on my computer in the left hand box. This is a great resource of all the journals, books and articles that you have referenced in the past.
To create a new reference click on New, the dialog box below will display.
Picture
Select your type of source. (this is important as it changes the options you need to fill in)
Click on Edit next to Author the box below will display
Picture
Enter the Authors Last, First and Middle name, Click Add.
If you wish to add another author, type in the names again and click Add, when you have finished click on OK
Fill in the rest of the information as shown below
Picture
Once you have filled in all of the required information click on Ok
You will need to make sure that the reference is listed under the current references 
Picture
If the reference is not on the current list, click on the reference and click copy => this will transfer the reference into the current list.
Picture
To insert and in text citation click on Insert Citation and a list similar to the one on the right will appear with a list of all your current references. 
Click on the reference you wish to insert and it will be placed where your cursor is.

Picture
Once you have completed your Report and want to insert a bibliography simply create a new page at the end of the document and click on bibliography. This will automatically create a bibliography at the end of your report that can be updated.


Using styles is a great time saver for formatting text and headings in your documents. If you are intending on using a table of contents then you will need to use styles for your headings and sub headings. You will find your style options on the home tab under styles.
Picture
To expand your style options click on the drop down button on the right hand side of the style selection box.
Picture
For the main headings in your document, select Heading 1
For the sub headings in your document, select Heading 2

Highlight or select the text that you wish to apply the heading to and click on the Heading style. You will notice your text changes to the format of the heading.

Modifying Heading Styles

To change the styles formats we must modify each heading style what we are using.
To modify a style right click on the style and click modify.
Picture
Picture
The display box to the right will display, you can change all font options and alignment options to customise the heading to your specification. Once you have changed the heading styles, click on the Ok button.

You can modify all of your heading styles individually to suit the needs of your documents once you have applied the heading style to your document you can then using the contents page function.


A table of contents is essential for lengthy documents like annual reports, books, and other types of documents. Fortunately, creating a table of contents in Microsoft Word 2007 is quite easy. With a few clicks of your mouse, you can insert a formatted table of contents in your document. And, adding entries to your table of contents is as easy as clicking a button.

Before creating your table of contents you must ensure that you are using styles for your headings in your document. For example, main heading would have style Heading 1, sub headings would be style Heading 2. Click on the Microsoft Word category for instructions on using styles.
Picture
Word 2007 provides different options for inserting a table of contents in a document. First, you can opt to insert a pre-formatted table of contents. Or, you can insert a customized table of contents in your document.

Decide whether you want to customize the formatting of the table of contents before you insert it in your document.

To insert a pre-formatted table of contents, position your cursor where you would like to insert the table in your document. Open the References ribbon. In the Table of Contents section, click Table of Contents. In the dropdown box that appears, select Automatic Table 1 or Automatic Table 2.

Picture
To insert a customized table of contents in Microsoft Word, position your cursor where you would like to insert the table in your document.

Open the References ribbon and click Table of Contents in the Table of Contents section. In the dropdown box that appears, select Insert Table of Contents.

The Table of Contents dialog box opens. You can specify whether page numbers are shown and how they're aligned. You can also specify how the tab leader line appears. Or, use the Formats box to select a formatting style for your table of contents.

Word will automatically pull entries for your table of contents from the document. But, you have several different options for marking table of contents entries. Keep reading for details.

Picture
You have different options for marking your table of contents entries in Word 2007. In the Table of Contents box, click Options. The Table of Contents Options box opens.

If you're working from an outline, select Outline levels.

You can also build your table of contents from styles. Select Styles in the Table of Contents Options box. Then, use the Available styles box to specify the styles that you will use to mark table of contents entries. Just enter the table of contents level for a style in the TOC level column.

Finally, you can mark table of contents entries manually. Just select Table of entry fields in the Table of Contents Options box.

Note: If you choose, you can use a combination of some or all of these marking options.

Once you've specified your table of contents options, click OK. Then, click OK in the Table of Contents box to close it. Your table of contents will appear in your document.

Picture
Word will automatically build your table of contents based on your selections.

If you selected the option to mark table of content entries manually, you can mark entries easily. Just select the text you would like to mark. Then, press Alt+Shift+O. The text will be included in your table of contents.

After marking an entry, you may want to update your table of contents. Open the References tab. In the Table of Contents section, click Update Table.


The NOW function, one of Excel's date and time functions, is used to add the current time and date to a spreadsheet.

The syntax for the NOW function is:

= NOW ( )

Picture
  1. Click on cell D1 - the location where the results will be displayed.

  2. Click on the Formulas tab.

  3. Choose Date & Time from the ribbon to open the function drop down list.

  4. Click on NOW in the list to bring up the function's dialog box.

  5. Click OK.

  6. The current time and date should appear in cell D1.

  7. When you click on cell D1 the complete function = NOW ( ) appears in the formula bar above the worksheet.

  8. If you want cell D1 to show only the current time or date, change the cell's format to show either time or date only.


The Master Slide is the design template or design theme used for the slides within your presentation. There are four different master slides title master, notes master, handout master and the most common, the slide master. Master Slides reduce the time it takes to format your presentations.

When creating a Master slide, you would generally create a background to be used, select the fonts and formats of the text to be used in the PowerPoint and select the slide transitions.

To create a master slide open Microsoft PowerPoint 2007 and click on the View tab on the ribbon and then Slide Master.
Picture
The Ribbon window below will display.
Picture
As you can see you are given all of the different slide layouts on the left hand side of the window. You can see in the image above that we have applied a background to three of the slide layouts.
When placing images like the Otago Polytechnic swirl on your slides these will not be able to be edited or moved in the standard slide creator view. (This is great if you do not want people to mess around with the designs of your PowerPoints).

Once you have created your background design you can format the text to your desired color, size and style. To do this simply click on the text that you wish to edit (remember slide masters acts as a design template so do not enter your content) and click on the Home tab, then format your text accordingly.

To apply transition effects between slides simply click on the slides and apply transitions as you normally would.

Once you have your design of your PowerPoint complete click on Close Master View on the master ribbon.
Picture
You are now ready to save your newly created master slide design as a template so you can use it in the future.

Click on the Office button on the ribbon
Click Save As
The Save As dialog box below will appear
Ensure you have the file destination correct for where you want to save the PowerPoint Template
Type is a File Name
Select PowerPoint Template (*.potx)
Click Save
Picture
You now successfully created a master slide template that you can use for future PowerPoint presentations

Using Master Slide Designs

Open your PowerPoint Template you just created
Click the Home tab
Click New Slide, you will notice the new design options appear in your new slide options
Click on the desired slide layout and start entering your content
Picture